I am mom to two daughters, ages 11 and 6. They are the sweet faces and creative minds behind their new YouTube Channel, Sisters Inspire.
The girls wanted to start a YouTube Channel that would positively inspire other kids the way so many of their favorite YouTubers have inspired them.
Their influences include Rosanna Pansino, Justine Ezariak, Molly Burke, Jesslyn Grace, Sand.Tagious and Come Play with Me.
The girls have a lot to offer and really balance each other out. They bring skills, fun ideas, and laughter to their viewers. Together they love to do games, challenges, food tasting, try products, and do art, DIYs and demos.
YouTube is a viable creative outlet for them and with the potential to not only bring joy to the girls as they create, but to those who view their content.
They have such a genuine passion for inspiring and uplifting others through their videos. Through Sisters Inspire, they want to share good with the world and bring smiles to people’s faces.
Their channel is a dedicated kids’ content channel, so other kids and parents can be sure that anything created on their channel is safe to view.
Please show some love, support and encouragement by checking out their channel, Sisters Inspire. ❤️
After three round of tie-dying with my daughters, we’ve pretty much nailed down all of the things NOT to do and things we would do different next time. We made our share of mistakes as newbies and I would love to share them with you so we are all better off. Here we go:
Prewash your shirt!
1. Prewash your shirts. Or at least use a wet shirt. You can kind of see in the picture above that the dye isn’t absorbing as well and running down the fabric. This was our second day of dying and we just flat out forgot to do it.
The good news is that if this happens to you, there is a work around. We waited the recommended 6-8 hours, then rinsed, squeezed out and put back in the bag for several more hours. It worked! A wet shirt really is necessary to achieve the more graduated pretty watercolor effect.
2. Use a shower curtain or tarp. As you can see in the above pic we used a shower curtain to place under us. We also worked outside. I’ll be honest, tie-dying is messy. The more systems you have in place to prevent messes the more fun you’ll have!
Use the gloves!
3. Use the gloves they provide. Otherwise your hands will look like mine. It took two days for this to wear off.
Use a fork to help with the spiral.
4. Use a fork. When you’re doing the spiral technique, using a fork can help keep the spiral tight. Just place in the center, then twist. You can use your hands to guide the rest of the twisting, as shown.
Rubber bands don’t have to be perfect.
5. Rubber band placement doesn’t have to be perfect. We did some spiral shirts where we were super careful and some where we weren’t and all of the shirts turned out nice.
I will say if you are wanting to achieve a certain pattern, it will be more important for you to divide into sections, almost like a pizza.
Don’t forget to flip it over and do the other side.
6. Flip it over! If you forget this your shirt will look half done. Once you’ve applied die to both sides, THEN you can bag.
Gallon sized ziplocs work great.
7. Use gallon sized ziploc bags. Once you have finished dying, if you buy the popular Tulip brand like we did, it comes with a box for you to place your shirts in. We wanted to do multiple projects at once, and ziplocs let us do this. They work great.
Do keep rinsing!
9. Keep rinsing until the water runs clear. After waiting the 6-8 hours for the color to set. The directions say to keep rinsing the shirt until the water runs clear. We did this, and machine washed and dried as instructed and still I ended up with two light blue towels in my next day’s load that were formally white. I would say, when you think you’re done rinsing, keep rinsing. And maybe machine wash twice!
Try other techniques!
10. Experiment with other techniques. We tried the technique pictured above and it was more of a true tie-dye. We used kitchen twine.
The coolest thing about tie-dye, is that matter what you do, or how many mistakes you may make, your project will still be a cool surprise in the end.
My husband and daughters gave me a very nice watercolor set for Mother’s Day, and I was able to try it out today.
I took watercolor classes when we lived in San Francisco, but I’m way out of practice. Just getting started by refreshing myself on some techniques.
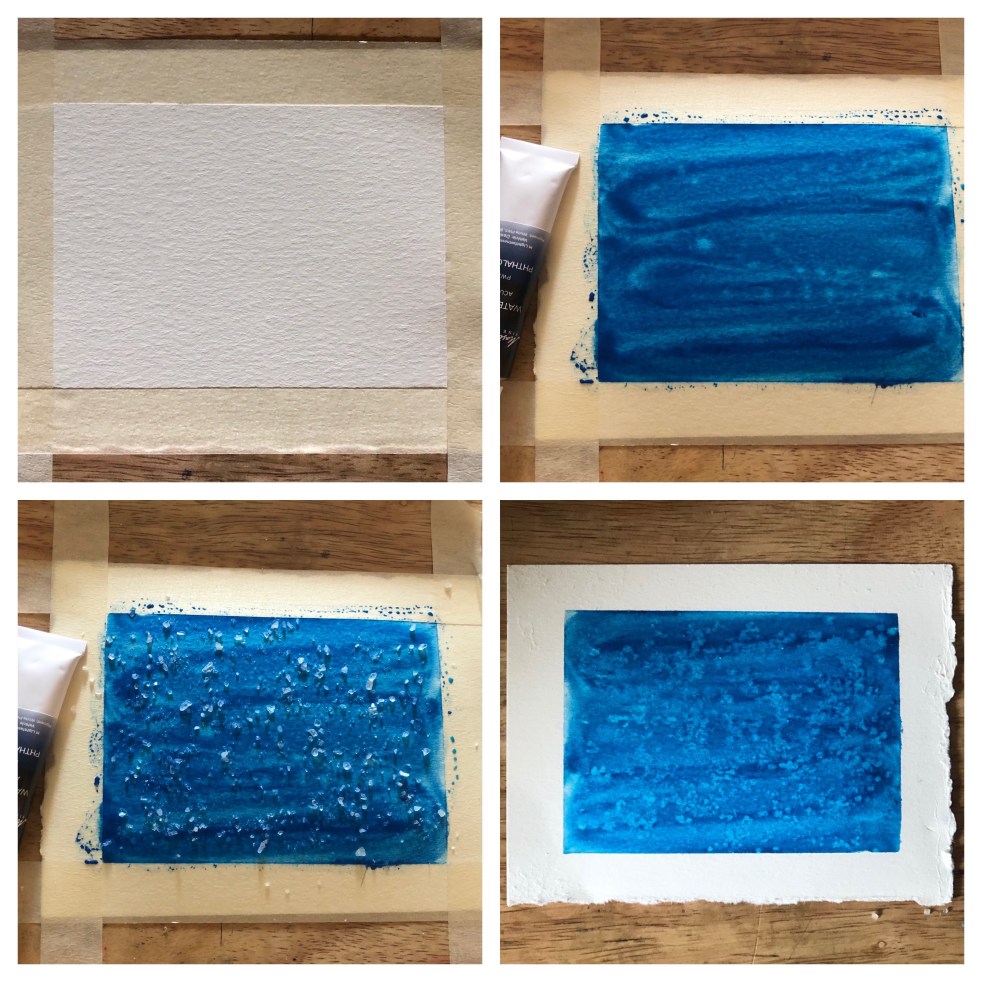
This is sea salt. Isn’t it cool? Steps are provided in the photo captions. 🎨🧂
Mask off the edges for crisp, sharp lines. Use good watercolor paper. This paper measures approximately 4” x 6”. Do a wash of color. I layered cerulean and phthalo blue. In retrospect I would use less water. Let partially dry, but while still wet, sprinkle on sea salt. Make sure painting is completely dry. If in doubt paint is totally dry, use a hairdryer. Shake off any lose salt. Then rub/scratch off any remaining salt.
Here is the post that inspired me and includes many other watercolor techniques to try.