I am mom to two daughters, ages 11 and 6. They are the sweet faces and creative minds behind their new YouTube Channel, Sisters Inspire.
The girls wanted to start a YouTube Channel that would positively inspire other kids the way so many of their favorite YouTubers have inspired them.
Their influences include Rosanna Pansino, Justine Ezariak, Molly Burke, Jesslyn Grace, Sand.Tagious and Come Play with Me.
The girls have a lot to offer and really balance each other out. They bring skills, fun ideas, and laughter to their viewers. Together they love to do games, challenges, food tasting, try products, and do art, DIYs and demos.
YouTube is a viable creative outlet for them and with the potential to not only bring joy to the girls as they create, but to those who view their content.
They have such a genuine passion for inspiring and uplifting others through their videos. Through Sisters Inspire, they want to share good with the world and bring smiles to people’s faces.
Their channel is a dedicated kids’ content channel, so other kids and parents can be sure that anything created on their channel is safe to view.
Please show some love, support and encouragement by checking out their channel, Sisters Inspire. ❤️
Picky eaters are not only tough customers, but it seems like the foods they will eat aren’t always the healthiest. This has been true of my six-year-old little girl.
There is a short list of foods she is willing to eat, and we have tried all kinds of strategies to encourage her to lengthen that list and try new things, often to no avail.
What has been successful is taking a look at the foods she will eat, and trying “upgrade” her the highest quality we can of those foods.
What I’m finding, and I really believe this, is that as we ramp up the nutritional value of the foods she will eat, and we have found a good pre/probiotic for her, she is now more open to trying new foods because our body craves what we feed it. When we feed it junk it craves junk. Now that she is taking in more nutrition she is craving more nutrition!
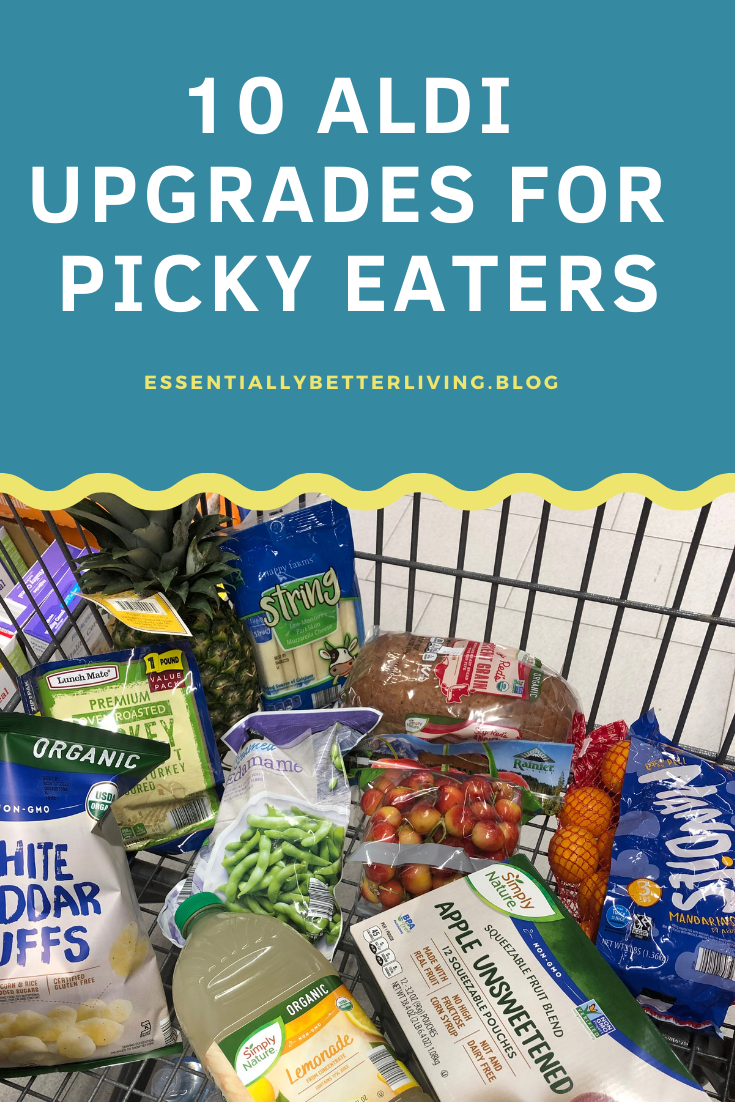
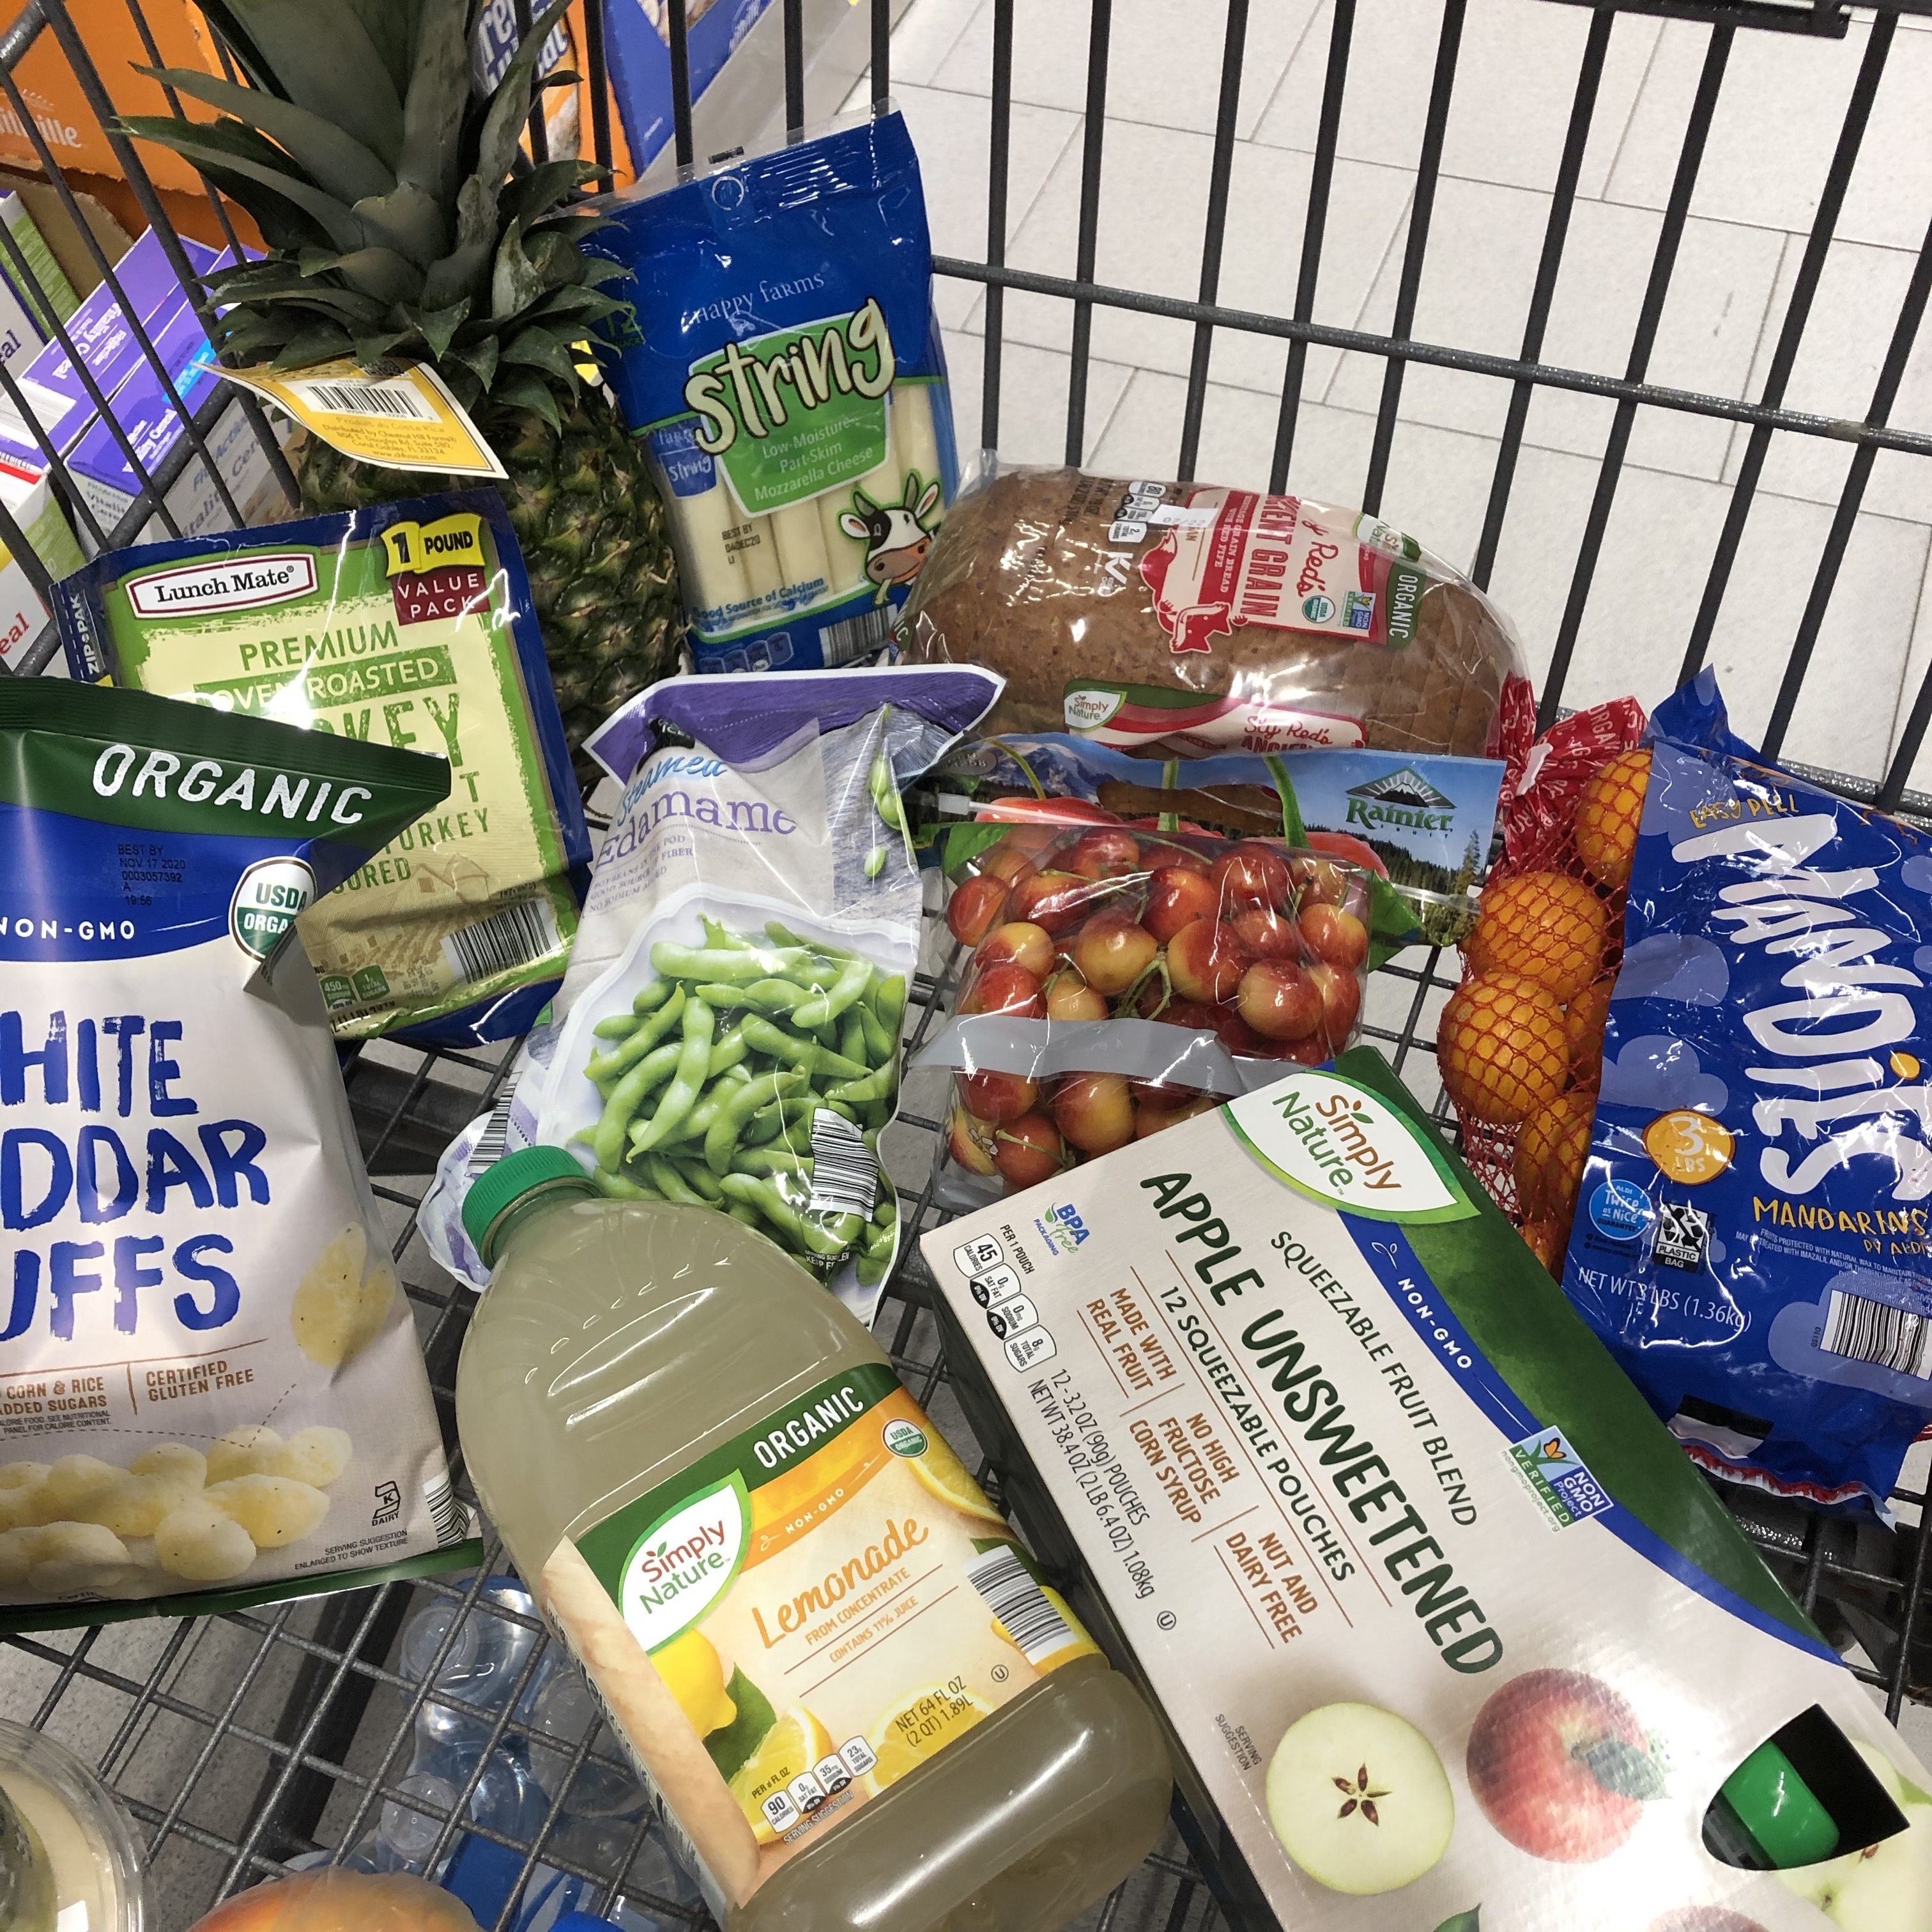
Here are 10 of our Aldi favorites that meet her seal of approval for taste, and mine for nutrition:
Whole pineapple. This is a big-time upgrade from canned pineapple since there are no preservatives and it’s not stored in an aluminum can, which is a concern in and of itself. Fresh pineapple tastes better and it will save you money. Pro-tip: You can test to see if a pineapple is ripe by pulling one of the inner-most leaves. If it comes out easily, it’s ripe. And don’t be intimidated by its spiny exterior. Watch a video or two on youtube of how to break down a pineapple. It’s easier than you think!
String cheese. This is a step-up from American “cheese” which actually isn’t a cheese at all. My kiddo loves the mozzarella and Colby spiral.
Ancient Grain bread. This is real bread with actual nutrition! Did you know the most popular brands of bread on the market, aka white bread, are white because the flour has been bleached? Bread should be brown, through and through. Also our wheat supply has been tampered with so even whole wheat sandwich bread can upset your tummy. They are processed to remove bran and natural oils so they will have a longer shelf life. I will be honest that we did use whole wheat sandwich bread as a transition bread and eased her into the Ancient Grain.
Mandies. My daughter loves these little mandarin oranges. There are an upgrade from the fruit cups that are often packed in syrup and definitely have preservatives added. Pro-tip: When shopping for healthier food for your family, a good rule of thumb is to shop the perimeter. The greater majority of junk food and foods containing preservatives are found on the aisles. By avoiding the aisles and shopping the outermost parts of the store (dairy, meat, breads, fruits, vegetables) you are much more likely to be putting healthy items in your shopping cart.
Simply Nature Unsweetened Apple Squeezes. These applesauce squeezes are not only missing the added sugar of the name brand Go-Go Squeeze, my kiddos prefer them.
Rainier cherries. This is a new fruit for our picky eater. There is only a short window that you can find them available (typically June-July). She loves these as well as any other raw cherry. These are an upgrade from the bright red cherries that come in a jar and no doubt have sugar and food coloring added – two things that will ramp her hyperactivity up at lightning speed. If your child is hyperactive, try cutting back food coloring (especially red) and sugar for one week and watch the difference it makes.
Edamame. My little girl likes very few vegetables. I could definitely count on my fingers how many she will eat. Edamame is one she loves, maybe just for the novelty of shelling them. I mean really, eating them is a fun experience. Aldi doesn’t always carry them, but when they do, they are going in the cart.
Simply Nature Lemonade. No GMOs and Organic. We add her prebiotic/probiotic to this lemonade, and it is delicious when combined. If your child doesn’t take one, Young Living makes an amazing one. It will help him/her to digest sugars and junk foods the body doesn’t normally or quickly break down. You can find them here and my referral number is 2183425 if you are asked for one. You’re welcome!
Simply Nature White Cheddar Puffs. Not only are these non-GMO and organic, but they also are an upgrade from their bright orange name brand counterpart.
Oven Roasted Turkey. This a premium one-pound pack and a step up from the name brand pack we bought previously. She loves a wrap with this turkey. In fact, she discovered today that she likes them with her mozzarella string cheese added.
These ten products are just a few ways that we have upgraded our picky eater’s diet by increasing the quality. I would love to know any of your favorites in the comments, or to know what products from this list you are excited to try.
After three round of tie-dying with my daughters, we’ve pretty much nailed down all of the things NOT to do and things we would do different next time. We made our share of mistakes as newbies and I would love to share them with you so we are all better off. Here we go:
Prewash your shirt!
1. Prewash your shirts. Or at least use a wet shirt. You can kind of see in the picture above that the dye isn’t absorbing as well and running down the fabric. This was our second day of dying and we just flat out forgot to do it.
The good news is that if this happens to you, there is a work around. We waited the recommended 6-8 hours, then rinsed, squeezed out and put back in the bag for several more hours. It worked! A wet shirt really is necessary to achieve the more graduated pretty watercolor effect.
2. Use a shower curtain or tarp. As you can see in the above pic we used a shower curtain to place under us. We also worked outside. I’ll be honest, tie-dying is messy. The more systems you have in place to prevent messes the more fun you’ll have!
Use the gloves!
3. Use the gloves they provide. Otherwise your hands will look like mine. It took two days for this to wear off.
Use a fork to help with the spiral.
4. Use a fork. When you’re doing the spiral technique, using a fork can help keep the spiral tight. Just place in the center, then twist. You can use your hands to guide the rest of the twisting, as shown.
Rubber bands don’t have to be perfect.
5. Rubber band placement doesn’t have to be perfect. We did some spiral shirts where we were super careful and some where we weren’t and all of the shirts turned out nice.
I will say if you are wanting to achieve a certain pattern, it will be more important for you to divide into sections, almost like a pizza.
Don’t forget to flip it over and do the other side.
6. Flip it over! If you forget this your shirt will look half done. Once you’ve applied die to both sides, THEN you can bag.
Gallon sized ziplocs work great.
7. Use gallon sized ziploc bags. Once you have finished dying, if you buy the popular Tulip brand like we did, it comes with a box for you to place your shirts in. We wanted to do multiple projects at once, and ziplocs let us do this. They work great.
Do keep rinsing!
9. Keep rinsing until the water runs clear. After waiting the 6-8 hours for the color to set. The directions say to keep rinsing the shirt until the water runs clear. We did this, and machine washed and dried as instructed and still I ended up with two light blue towels in my next day’s load that were formally white. I would say, when you think you’re done rinsing, keep rinsing. And maybe machine wash twice!
Try other techniques!
10. Experiment with other techniques. We tried the technique pictured above and it was more of a true tie-dye. We used kitchen twine.
The coolest thing about tie-dye, is that matter what you do, or how many mistakes you may make, your project will still be a cool surprise in the end.